A Photoshop adjustment changes other layers too
Limit a color or tone adjustment to one underlying layer with a clipping mask, then distinguish a wrong target from a mask or selection problem.
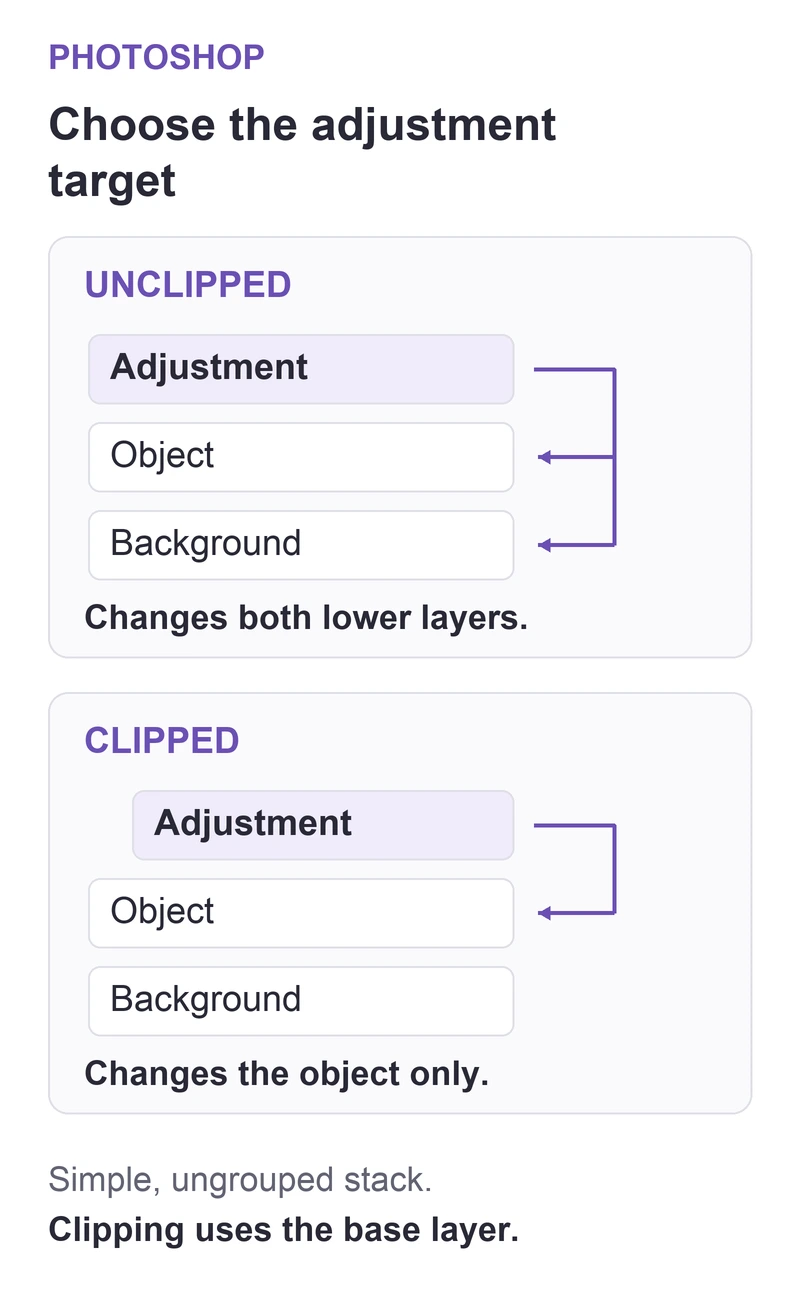
In an ordinary ungrouped layer stack, an adjustment layer affects the layers below it. If a correction for one object also changes the background, select the adjustment and use Layer > Create Clipping Mask with the intended object layer immediately beneath it.
In this guide
Photoshop desktop on Windows or macOS. A simple ungrouped layer stack with a separate adjustment and target layer. Group blending, multi-layer clipping stacks, and selections within a flattened photograph require additional checks.
Clip the adjustment to its intended layer
Save a separate layered copy before rearranging an existing design. Moving layers can change how the whole composition overlaps.
Identify the target before creating the clip
Open Window > Layers and locate the adjustment and the artwork it should change. For a simple example, the stack should read:
- Adjustment layer
- Object layer to adjust
- Background
If another image sits between the adjustment and the intended object, the clipping relationship will use the wrong base. Put the adjustment directly above the target in your working copy before creating the clip.
Adobe's single-layer adjustment tutorial demonstrates why an ordinary adjustment changes multiple underlying layers and how clipping limits it to one. It also shows that another adjustment needs its own clipping relationship; adding one above an existing clipped adjustment does not automatically make the new correction local.
Create the clip and compare the result
- Select the adjustment layer's row in the Layers panel.
- Choose Layer > Create Clipping Mask.
- Check the Layers panel: Adobe documents an indented clipped layer and an underlined base-layer name.
- Toggle the adjustment's visibility once to compare the object and the background, then restore the intended state.
The object should receive the correction while unrelated lower artwork keeps its earlier appearance. The clipping-mask reference explains that the base layer's nontransparent content defines where clipped content can appear.
If the change is still wrong
| Result | What to inspect |
|---|---|
| A different object changes | The actual base beneath the clipped stack |
| More than one correction remains global | Whether each adjustment is clipped |
| Only part of the intended object changes | The adjustment's own mask and the base's visible content |
| The object and background are one flat layer | Clipping targets that whole layer; it cannot separate the two subjects |
Clipping chooses a layer; a layer mask can restrict an adjustment within that layer. If only a face or one part of a single photograph should change, use the adjustment's mask rather than expecting clipping to identify that subject. The mask-thumbnail guide covers where to paint without changing image pixels.
For a deliberately global correction, leave the adjustment un-clipped. Layer > Release Clipping Mask removes the relationship; check the selected layer and the rest of a multi-layer clipping stack before using it. Groups and more complex blending arrangements need their own review rather than repeated toggling.
If a simple three-layer copy still behaves unexpectedly, use the Community link in Adobe's clipping-mask guide. Include the Photoshop version and a cropped layer-stack view with client names and artwork removed.
Sources
Based on official documentation; not independently tested. Sources checked Oct 3, 2026. How we review guides
Something out of date? Let us know.
Related fixes
Photoshop exports extra transparent space around artwork
Trim an export copy to the visible artwork without changing the fixed canvas used by your working document.
Photoshop cannot save a document larger than 2 GB
Save a large layered master as PSB without flattening the only editable copy, and separate format limits from storage errors.
Photoshop paints on the image instead of its layer mask
Choose the mask thumbnail before painting. If the mask changes but the picture does not, check whether the mask is disabled.